For our kids 7th and 9th birthdays we had a carnival for each of them and did it on a budget! I can’t afford to spend a lot of money on birthday parties but I still want them to be spectacular so for our carnival I made almost all the games. I estimate the party for TWO carnival parties was around 150 dollars.
I used a print program called print master to make my invites. I used pictures of balloons and confetti and it said: You are invited to our birthday carnival! The carnival opens at 2:00pm, Join us for games, food, fun and prizes! I also added the address, phone/email to rsvp and some hot dogs and popcorn graphics.
Each child was given a small gift bag with their name on it. At each game there was a box covered in wrapping paper for prizes. When they finished a game, win or lose they collected their prize, this became their loot bag!
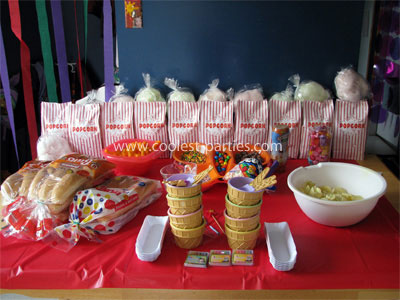
For lunch we served hot dogs in hot dog holders that looked like the paper ones at a carnival. I got them at our local dollar store. Each child took home a bag of popcorn and cotton candy. I got the red and white striped popcorn bags at our local dollar store as well.
I popped the popcorn and filled the bags the day before, I stapled the tops shut for freshness. To avoid grease on the bags I used butter flavoring and salt rather than melted butter, the bags stayed neat and the popcorn smell added to the theme!
The cotton candy was purchased at a local shop.
Instead of cake we had a sundae bar. I had premade ice cream in my ice cream machine but also had it running making fresh ice cream at the party so we had soft ice cream. My son is lactose intolerant so we made the ice cream lactose free. We had chocolate, peanut butter and vanilla at the party.
I had all of the kids favorite candies, we also had bottles of chocolate and caramel sauce and a jar of marshmallow fluff. Everyone chose their own ice cream flavor and toppings.
Homemade Fun Carnival Games
You don’t have to be super-crafty to do this, I’ll tell you how to make each game! I mostly used scrap cardboard and boxes, plastic containers, acrylic craft paints and packing tape.
Marble Maze: I used a large cardboard box and cut it in half so that it was about 3 inches deep. Then I used the scraps to make walls for the marble to run through. I cut some trap door holes in the bottom of the box as traps. I taped the walls in and once I was satisfied with the difficulty, I paper-mached it. I didn’t use special glue. All I did was mix white glue and water so that it was runny, tore up strips of news paper, dipped the strips in the glue and covered the entire maze so that it was fairly smooth. It dried over night and I painted it with acrylic paint. I cut a hole where I wanted them to finish and taped a small yogurt cup to the bottom of the box to catch the marble.
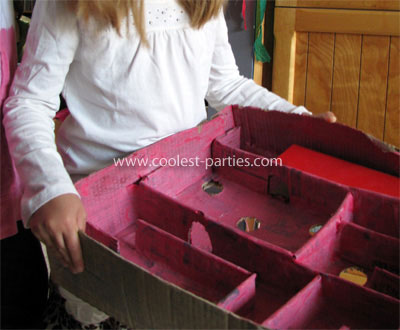
They held the whole maze in their hands and shifted it to make the ball move.
Bean Bag Toss: I used a large sheet of cardboard (you can often get a big piece from furniture stores). I cut out six holes, painted the entire piece red and painted around the holes to look like paint splatters. I numbered the holes 1 through 6 for points.
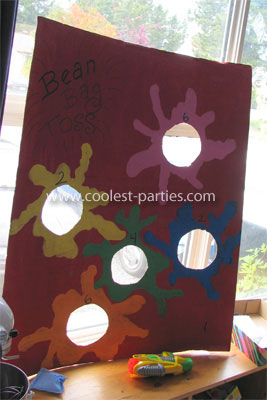
I used scrap fabric to sew 4 bean bags(I’m not the greatest sewer so they were not very neat but the kids didn’t care). I cut two squares of fabric the same size, about 4 inches square. Then I sewed around 3 of the sides(about half an inch from the edges) I filled them with dry rice and then sewed them shut! I just taped it to my window at the top so that I could angel the bottom out a bit. Then toss away!
Hole in One: I cut a piece of cardboard for the putting green and because I didn’t want the ball to slip off I also cut sides the to basically make a trough. I cut the sides in a wave shape. I painted it green. I bent a piece of cardboard into a triangle shape and taped it to the bottom of the green so that it was on an upward angle. I cut a hole in the middle at the top taped a plastic cup to the bottom to catch the ball. The kids used a plastic golf club we had and took 3 shots each at the hole.
Duck Hunt: This was the simplest and the MOST popular game. I used my print program to find a picture of a duck, then found a bulls eye and overlaid it on top of the duck and printed them out I covered them in clear tape (you can also use clear contact paper). I taped smoothly over the duck to give it strength.
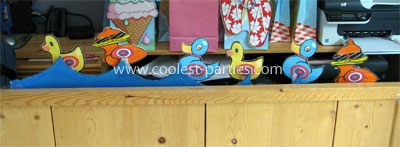
I used the other half of the wave shaped piece that I had cut from the hole in one game and painted it blue. I taped clothespins on the back of the wave (so that the clip was at the top of the waves), and taped that to the back of our bench. The kids took turns using a Nerf gun to shoot them down!
Milk Bottles: I had help with this one, but you can do it on your own. My dad made 6 bottles out of scrap wood, I painted them white with a red stripe on the neck like old fashioned milk bottles.
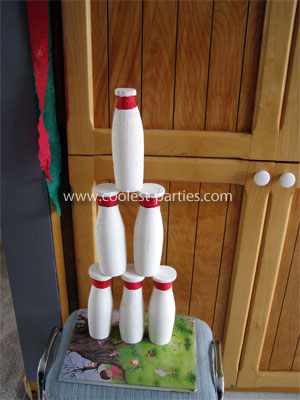
If you don’t have a woodworker in your life you can do this with plastic soda bottles. Paint the bottles the same way it will probably take 2 coats on plastic. Fill them with a bit of water or sand so they have some stability. If you use soda bottles tape the lids shut. Set them up in a pyramid formation. To set up bottles with small lids, place a small strip of cardboard between each layer to stack them. I used foam ball, each child got 3 shots!
Skee Ball: This is my favorite and once I planned out how I wanted it, it wasn’t that difficult to make. I used a two long wide strips of cardboard taped together for the ramp. I painted them green. I made the top part separately. I used a large square piece of cardboard the same width as the ramp. I glued on two small containers one in each top corner, I glued 3 bigger plastic containers down the middle. I cut cardboard strips to make a larger circle. I taped one larger circle between the two top containers so that it was big enough to come down past the bottom container and the other in a horseshoe between the small corner containers.
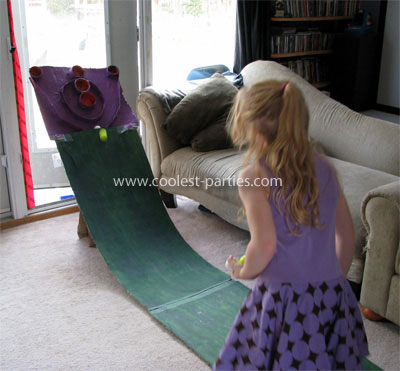
I did the same “paper mache” technique as marble maze to strengthen the whole thing. When it was dry I painted it purple, and the insides of the cups orange. I used a sharpie to mark points on the inside of each cup. To make the ramp bend I made a large cardboard triangle that I taped under the ramp. To attach the top part I cut slits in the bottom and slid the slits onto the ramp and taped them. I leaned the top against the wall for support.
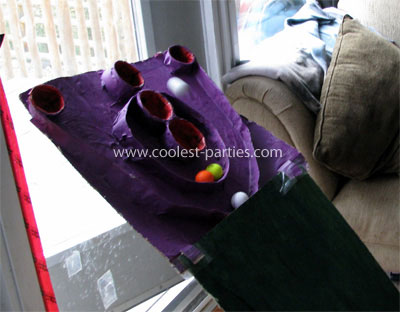
We used golf balls, each child got 6 throws to score as many points as possible.
The favorite prize was the cd’s. I made cd’s of my kids favorite songs that year. I bought blank cd’s in clear cases. I used my print program to make a cover and a playlist. The cover said Thank you for celebrating my 7th birthday with me. It had a picture of my child and some graphics to match the theme. I printed out the covers and playlists to fit in the jewel cases and taped them back to back, slid them in the cases. I made a playlist of songs on my computer and burned them to the cd’s. They were so popular we plan to make them every year as a thank you gift!
Face painting: The kids chose to face paint each other instead of having me do it!
Once all the planned party was done the kids went back and played the games again.
Over all this was my favorite party. It took some time and planning to create the games but it was worth it. Every one had a ton of fun and people still ask me about it!
