Kid face painting is a BIG favorite amongst children ages 3 to 99!! You’ll find great face painting birthday party ideas on this page.
Getting Ready Tips
- Kids should put their hair back with a clip / hairband.
- Clean their faces with a moisture wipe or tissue.
- Prepare lots of towels and tissues & have a few mirrors available.
- Prepare different sized brushes & sponges.
- Prepare a few bowls filled with warm water for cleaning the brushes when changing colors.
Tips for the Actual Face Painting
- You can use a dry sponge, brush and even your fingers to apply the paint
- When switching colors, the brushes/sponges/fingers need to be washed. However, make sure to dry them off with tissues/towels completely because excess water will make the face painting colors runny.
- Prepare stencils of stars, moons, flowers, hearts, etc. to apply on the cheek if you are not comfortable painting free-hand.
- You should start with the lightest colors (while it is possible to use white over black you will get a much bolder contrast when you paint black over white).
- Make sure to let the first color dry before applying a second. If not, the colors will mix and you’ll probably have to wipe everything off and start again.
- Think thin. Rather than applying one thick layer of paint (which may crack) apply a thin layer, let it dry, and then apply another.
- Go for some special face painting effects! The paint works as a basic glue, so you can create funny features like bumpy noses or big eyebrows. For warts, take puffed rice, cover with a piece of tissue, paint and glue on to the face. For big eyebrows soak a bit of cotton wool in the paint, place on the face, cover with a piece of tissue, and paint. If you want a ghostly effect apply a light dusting of flour once you’ve finished painting the face (be sure to get your subject to close their eyes tightly). Glitter is also great for a quick, dramatic face painting effect. But, keep in mind that it can scatter everywhere and “stick” around for quite some after the party has ended.
Precautions
- If there’s a kid that has a cut or open wound, fever, disease (like chicken pox) DO NOT PAINT THEM!! In these matters use common sense and avoid such problems.
- If you are concerned that someone may have very sensitive skin, you can first start by applying a little paint on the inside of their wrist and wait at least half an hour to see if there’s a reaction.
- Make sure you are super careful when painting close to the eyes. Have them look up when painting below the eyes, and eyes shut when painting above them.
Visitor-Submitted Face Painting Creations
Cat
Submitted by Gene D. from South Elgin, IL
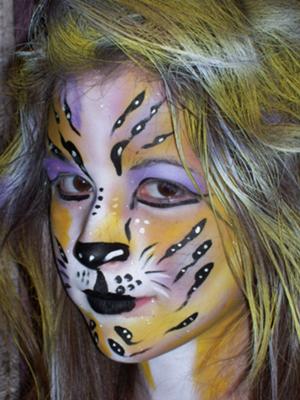
- Airbrush hair
- Airbrush white over facial area & neck
- Airbrush other colors (streaks)
- Airbrush eyelids carefully
- Try to blend as much as possible
- Use a brush & work the black paint in all required areas (nose, stripes, etc)
Scary Clown
Submitted by Gene D. from South Elgin, IL
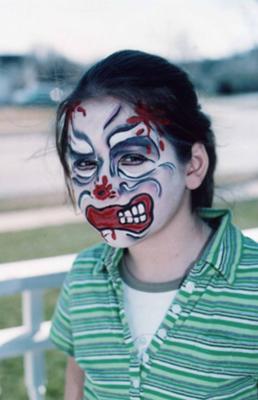
- Apply white with sponge
- Blend in gray accordingly
- Paint outline of mouth red
- Paint around eyes with black
- Paint teeth in white
- Paint blood with red accordingly
- Detail as much as possible in black
Kool Kat
Submitted by Teleza T. from Mount Wolf, PA
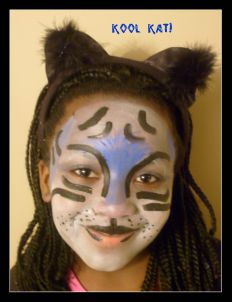
- Cover face with white face paint
- Apply blue to the bridge of the nose
- Apply light blue to sides of face
- Apply black stripes accordingly
- Paint top lip black
- Outline bottom lip black
- Add whisker holes
Easter Bunny
Submitted by FairyDust Faces from Sonoma County California
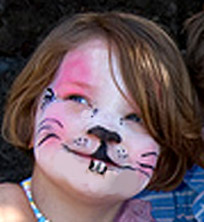
Always use an approved face paint makeup. Acrylic and craft paint are not for use on the skin… don’t risk it on your child or anyone else!
- Using a sponge do a light coat of white all over. I recommend Snazaroo (professional grade and made especially for young children and those with sensitive skin)
- With the same sponge add pink to cheeks and above eye.
- Blend the pink so there are no hard lines
- Using a paintbrush add black lines: nose, whisker and whisker dots, and teeth are the most important parts.
Blackhawks
Submitted by Gene D. from South Elgin, IL
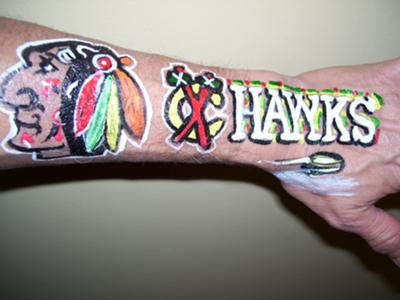
- Paint face brown
- Paint each feather
- Use black for hair and other details
- Outline all in white
- Letter the words in white and give shadows with black
- Use other colors as background
Bumble Bee
Submitted by FairyDust Faces from Sonoma County California
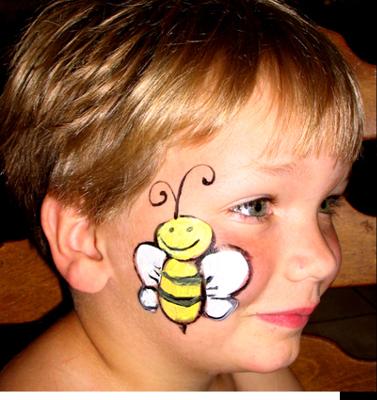
Always use an approved face paint makeup. Acrylic and craft paint are not for use on the skin…don’t risk it on your child or anyone else! I recommend “Snazaroo” face paints (professional grade and made especially for young children and those with sensitive skin)
- Using a big round brush draw 2 yellow ovals; one horizontal, one vertical.
- Add 2 white half circles to each side of your bee body.
- Outline in black using a smaller round brush
- Add a simple smile face and stripes once the yellow paint is dry.
- Add curly antenna and small triangle as a stinger on the bottom.
Homemade Face Painting Recipe
Nowadays, face paints are quite cheap and available pretty much everywhere. However, if you’re into brewing your own potions, why not make your own face paints with this easy recipe.
The recipe contains food coloring so like any kind of paint, precautions should be taken in case of allergies and clothe staining (may slighly tinge skin but it always washes off by days end). You’ll need:
- Face Lotion
- Corn Starch
- Food Coloring
Combine about half a cup of face lotion (or cold cream) with two tablespoons of cornstarch in a bowl. Continue to add cornstarch until you reach the desired texture (this is the base).
You’ll then want to mix your own colors, so put the base mixture you’ve just created into three small containers. Then, add food coloring to each container: Red, Blue, and Yellow (mix each color so that they are two times darker then what you want them to show up on the face).
Red, Blue and Yellow are the base colors for all the rest of the colors. For instance blue and red make purple, blue and yellow make green, red and yellow make orange, white with red is pink, etc. So with these three colors you can make an array of more colors.
Two things to take in account: 1) It takes this face paint a while to dry, so make sure you tell the kids before you paint their faces. 2) Paint it on thinly if you want your drawings to keep on face (cold cream slides off and is sweat off easily).
Kid Birthday Parties › Kid Activities › Face Painting Ideas
